Friday, January 6, 2012

Dark Days Challenge: Leek with Montaña Cheese Panade


There is something very comforting about panade on a dank, rainy west coast winter evening. Paired with a blanket, some sherry or wine, and a good movie, one's bones finally have some hope to warm up. After the excesses of the holiday season, panade is a great way to use up old bread and have a dinner that won't leave you feeling like a small anvil has taken up residence in your belly. Panade is a French term that means 'bread mash'. This particular panade recipe is a great way to showcase local Vancouver Island leeks, garlic, SaltSpring Montaña (hard sheep's cheese), and lovely locally made bread for the Dark Days Challenge.


This panade is easy to make and works as a main course for four, or a side dish for eight people. 

Ingredients

1 1/2 pounds thinly sliced yellow onions
Up to 1/2 cup mild-tasting olive oil
6 cloves garlic, thinly sliced
Salt
1 pound leeks (upper third of green leaves removed), cleaned and cut into 1-inch-wide ribbons
10 ounces day-old chewy rice bread cut into rough 1-inch cubes
Up to 4 cups chicken stock
6 ounces Montaña (a hard sheep cheese or Gruyere will do), coarsely grated

1. Place the onions in a deep  4-quart saucepan and drizzle and toss with oil to coat, about 1/4 cup.  Set over medium-high heat and cook  until the bottom layer of onions is slightly golden around the edges,  about 3 minutes. Stir and repeat.

2. Once the second layer of  onions has colored, reduce the heat to low and stir in the garlic and a  few pinches of salt. Stew, stirring occasionally, until the onions are a  pale amber color and tender but not mushy, another 20 minutes or so. If  at any point the onions look as if they may dry out, cover them to trap  some of the moisture in the pan. Taste for salt. You should get about  2 1/4 cups cooked onions.

3. Preheat the oven to 325  degrees (or as low as 250 degrees, if it suits your schedule to stretch  the cooking time from about 1 hour 45 minutes to 2 hours 45 minutes; the  slower the bake, the more unctuous and mellow the results).

4. Place a few handfuls of leeks in a 3-quart saute pan or a  10-to 12-inch skillet with a drizzle of oil, a sprinkling of water (see David Leibovitz's instructions for washing leeks properly), and a  few pinches of salt. Let the water start steaming, and stir the leeks about. They should be translucent. Test for salt and correct as necessary. Set aside.

5. Toss and massage the cubed  bread with a few tablespoons of olive oil, a generous 1/4 cup of the  stock and a few pinches of salt, to taste.

6. Choose a flameproof, 3-quart  souffle dish or enameled cast-iron Dutch oven. Assemble the panade in  layers, starting with a generous smear of onions, followed by a loose  mosaic of bread cubes, a second layer of onions, a shimmering layer of leeks, and a handful of the cheese. Repeat, starting with bread,  the onions and so on, until the dish is brimming. Aim for 2 to 3 layers  of each component, then make sure the top layer displays a little of  everything. Irregularity in the layers makes the final product more  interesting and lovely. Drizzle with any remaining olive oil.

7. Bring the remaining 3 3/4  cups stock to a simmer and taste for salt. Add stock slowly, in doses,  around the edge of the dish. For a very juicy, soft panade, best served  on its own, like a soup or risotto, add stock nearly to the rim; for a  firm but succulent panade, nice as a side dish, fill to about 1 inch  below the rim. Wait a minute for stock to be absorbed, then add more to  return to the desired depth. The panade may rise a little as the bread  swells.

8. Set panade over low heat and  bring to a simmer; look for bubbles around the edges (heating it here  saves at least 30 minutes of oven time; it also means every panade you  bake starts at the same temperature, so you can better predict total  cooking times). Cover the top of the panade  with parchment paper, then very loosely wrap the top and sides with  foil. Place a separate sheet of foil under the panade or on the rack  below it, to catch drips.

9. Bake until the panade is  piping hot and bubbly. It will rise a little, lifting the foil with it.  The top should be pale golden in the center and slightly darker on the  edges. This usually takes about 1 1/2 hours, but varies according to  shape and material of baking dish and oven. (You can hold the panade for  another hour or so; just reduce the temperature to 275 degrees until 20  minutes before serving.)

10. Uncover panade, raise  temperature to 375 degrees, and leave until golden brown on top, 10 to  20 minutes. (If you aren't quite ready when your panade is, re-tent the  surface with parchment and foil and reduce the heat to 275 degrees. You  can hold it another half hour this way without it overbrowning or drying  out.) Slide a knife down the side  of the dish and check the consistency of the panade. Beneath the crust,  it should be very satiny and it should ooze liquid as you press against  it with the blade of the knife. If it seems dry, add a few tablespoons  simmering chicken stock and bake for 10 minutes longer.

Wednesday, December 14, 2011

Dark Days Challenge (week 2): Cabbage rolls and the Failed Sauerkraut

It's getting cold in Victoria. Cold enough that the layer of freshwater that sits on top of the saltwater in the Inner Harbour froze. Victorians are not like prairie folks. They like their winters mild (meaning, some rain, some fog, and not much else), their car engines without heating blocks, and they've never heard of socials (usually a fundraising event for someone's wedding).  However, I do have something in common with those dear little shops in Winnipeg run by Ukrainian or Polish babas or babcias (grandmothers) that sell borscht nd holubtsi - I love to make (and eat) cabbage rolls.

The fist-sized gołąbki or holubtsi has a shadowy history that probably goes back well before the 15th century, but apparently cabbage rolls had a role in empowering the Polish army to defeat the Teutonic Order in 1465. There are cabbage roll variants all over the world. My mother used to stuff kale leaves with a mixture of meat and sticky rice. In Turkey, they make sarma - large plant leaves stuffed with a meat filling. Another variant called holishkes is considered a traditional Jewish dish served at Sukkot. My own introduction to cabbage rolls began in Victoria well over a decade ago when I worked at a cafe for a Filipino woman who was married to a Mormon Ukrainian. Son of Thunder, we called him. She did make great cabbage rolls though.

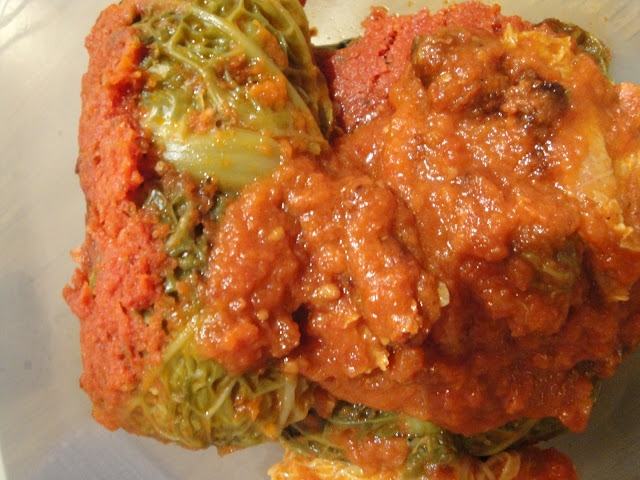
Back at the Dark Days Challenge kitchen, I had a beautiful head of locally grown savoy cabbage, light emerald in colour with lovely leaves. Perfect for making cabbage rolls. I cut out its core most carefully as you can see above. I dropped the entire cabbage into a pot of boiling salted water for 5 - 8 minutes until the leaves were softened. I popped the cabbage into a strainer and waited until it cooled down.

Working carefully from the hollowed out core, I peeled off the leaves carefully and put them in a pile on the counter. I used the tiny leaves at the core to line my baking pan. I tucked a bay leaf or two in there for flavour.

If the leaf rib is too thick or knobbly, neatly slice it down. Or you can do what I did. Use your fists of Dark Days kitchen fury and give it a good thwack. One of the objectives of my cabbage rolls is to achieve fist-sized rolls (I've seen tinier rolls the width and length of two fingers. I like mine bigger). A fist sized roll requires about three to four generous tablespoons or one icecream scoop of meat filling. I don't measure, so I'm guessing. At any rate, the filling should look about like that when you plop it onto your cabbage.

Lift the end of cabbage closest to you and bring it up so that it just covers the meat filling.

Fold over the right and left sides of the cabbage. Your little cabbage packet should be forming nicely. If the cabbage doesn't bend easily, it means you didn't steam it long enough. Pop it into the microwave to soften it up if the cabbage is breaking on you.


With your fingers, make sure the meat filling is nicely packed into the folded cabbage. Hold both ends of the cabbage roll and turn it over so that the end of the cabbage leaf furthest from you covers the folded-in sides. Place the roll in your baking pan with the open leaf end facing down.

With all that cabbage in the kitchen, I decided to try my hand at making sauerkraut. We mandolined the cabbage into a fine shred.

We gently crushed some juniper berries and mixed it in with the rest of the ingredients. After a week, it was a smelly, moldy, terrible mess. An utter failure. However, the cabbage rolls were a delightful, delicious success.


Don't be afraid to use two cabbages! Once cooked, cabbage rolls keep quite well in the freezer. Just foil wrap them in meal-sized portions, put them in ziploc bags and they'll be just fine. I ate mine after several months and they were still quite good.

Ingredients

2 cups uncooked long grain rice
4 cups water
2 large heads savoy cabbage
1 cup water
2 onions, chopped and lightly sauteed until translucent
3 tablespoons butter 
1 tablespoon olive oil
3/4 cup uncooked long grain rice
1 pound extra-lean ground beef
1/2 pound spicy pork sausage or 1/4 pound kielbasa mixed with 1/4 pound pork sausage
4 cloves garlic, minced
2 teaspoons dried dill weed
1 full tsp smoked extra hot paprika 
2 teaspoons of ground coriander
3/4 teaspoon salt
1/2 teaspoon ground black pepper
1/2 teaspoon white sugar
2 (28 ounce) canned whole peeled tomatoes, with liquid
8 bay leaves

Method 

1. Fill your kettle up and get it going. Get a pot big enough to fit one of your cabbages in.

2. Wash rice thoroughly. In a medium saucepan, combine 2 cups rice and 4 cups water. Bring to boil; reduce heat, cover and simmer for 20 minutes or until all of the water is absorbed.

3. Get a long thin knife - a boning knife is great for this - and remove the core from your cabbages. Pour your boiling water into your pot and make sure the water comes up to a boil. Salt the water. Put your cabbage into the boiling water and cook for 5 - 8 minutes. Put it in core side down first, and gently turn over once. Repeat with the other cabbage. Put them in a strainer and let them cool down enough so that you can handle them.
4. Peel the leaves as directed above in the photos.

5. Saute the onions in butter and olive oil. Add a bit of caraway seed if you like - perhaps a teaspoon. Don't brown your onions. You want them transcluent.

6. Get your biggest mixing bowl out. Mix the uncooked and cooked rice, onions, meats, and all the spices, salt and sugar together. Get in there and mix it well - I suggest getting in there with your super clean hands.

7. Pre-heat your oven to 350 degrees Fahrenheit. Get two 9x13 baking dishes and line with the little abbage leaves that are too small to make rolls with. Nestle the rolls in a single layer, tightly together in the pans.

8. Run your tomatoes through a blender or food processor. You could add a bit of oregano or more dill to your tomato sauce if you like. Check the salt level in your sauce and add as required.  Pour sauce over the rolls until they're just covered. Place the bay leaves on top of the sauce, and cover each dish tightly with good aluminum foil (Use good foil - I used the not so good stuff and the acidity of the tomato ate through the foil. Gross.).

9. Bake for two hours. Let the pans cool for 15 minutes before removing the foil. Serve hot with potatoes and borsht.

*All ingredients were locally sourced except for the rice (closest rice growers to me are in California), pepper, paprika, and coriander.

Sunday, December 4, 2011

An Affair to Remember: Brussel Sprouts

With some trepidation, this year, I decided to take up the gauntlet thrown down by the Dark Days Challenge to cook one meal per week that features SOLE (sustainable, organic, local and ethical) ingredients. And blog about it. And keep this up between November 27, 2011 until March 31, 2011. Did I mention I live on Vancouver Island? (Vancouver Island is not known for grain production, so helloooo potatoes.) Did I also mention I just moved house with Ck and changed jobs? 

Enough with the explanations and caveats. Among all the things I love about the late fall/early winter are brussel sprouts. It's a love that came to me recently. My memories of brussel sprouts as a child involve muddied green vegetables that verged on the bitter and profane. Little did I know then about the miracles of high heat, olive oil, and good local salt. After buying an enormous stalk of brussel sprouts grown at the local family-owned farm, Michell Farms, I considered the possibilities.


First I washed, trimmed the ends of these beauties, and cut them in half.  With the first batch, I simply tossed them with a good cold-pressed olive oil and locally made salt from Vancouver Island Salt Company. I popped them into a 400 degree Fahrenheit oven on a cookie sheet. You cook them for about eight minutes, flipping once. Don't crowd the sheet like I did. After I flipped them, I popped a little sliver of goat cheese I obtained from the Saltspring Island Cheese Company on each piece. These brussel sprouts are both delicious and an incredibly addictive finger food. I found serving them to people while they're drinking and watching you cook is an effective way to stave off the hangry [hang-ree]. Urban Dictionary defines 'hangry' as the state of being so hungry that one either becomes angry or frustrated or both.
With the second batch, I did something a little different. I tossed them with lovely local honey my good friend Matthew Tooley purveys at the Cottlestone Apiary, a bit of olive oil, and a smidgen of sesame seeds (yes, not from the island, but I'm going to cry 'Uncle!' and say it's the spice I needed). This is my most favourite way to cook and consume brussel sprouts. I hope you love them too. 

Honey-Sesame Roasted Brussel Sprouts

4 cups brussel sprouts, trimmed and halved
2 tablespoons of honey
1 tablespoon of olive oil
1 tablespoon of walnut/grapeseed/peanut oil
salt to taste
2 tablespoons sesame seeds 

Method:

Preheat oven to 400° Fahrenheit.

Toss brussel sprouts with a mixture of olive oil and honey. Sprinkle with a pinch of salt.

Bake for 20-25 minutes on a cookie sheet. If you want lovely colour, be a bit precise and finicky and flip them each over at the 10 minute mark.

Remove from the oven when they're well browned and toss with the sesame seeds.

Serve immediately. Serves four.

Tuesday, September 27, 2011

Seduction by Dinner: Asado Negro with a Salad of Palm hearts and Avocado


Tamils say love begins in the eyes. We have terms of endearment that involve use of the word "eye." It's the same with Mandarin. I suspect other languages probably make the linkage between the eyes and love - even English does with its idiomatic phrase "apple of my eye." It's not particularly fair to people who can't physically see, but maybe it's the metaphysical eye they're talking about. The third eye that sees things your physical eyes cannot.

I think this plate of asado definitely inspires fierce love even though the photograph hardly does justice to all the other things about asado that appeal to the senses - the long wait while it transforms into something divine, the intensely aromatic waft of slow-cooked meat, caramelized vegetables and vinegar cooked down to a muted punch. Asado is the best pot roast you could ever eat - the meat is perfectly tender, the texture is heavenly, and the darkened, fulsome and robust flavour of all the things it's cooked with goes right to the centre of each bite. It defies description.

Inspired by my recent return from South America and its extraordinary parrilla restaurants (grilled meat restaurants) and mighty outdoor chivito (baby goat) fire-side grills, this blog post is about my first attempt to make asado negro (black roast). Asado is a generic term for a range of barbecue techniques or can be used as a verb to describe having or attending a barbecue. 

More importantly, it's easy to make and as long as you don't let on, you'll come across as an absolute culinary genius when you serve this to your closest friends with some strong dark beer or a decent zinfandel (or Malbec).


Cooking asado negro is a process that requires a bit of committment. It's the sort of recipe you tinker with on a Sunday afternoon while you drink a fine Chilean wine, or one you frantically prepare on a Friday afternoon to impress someone (in my case, Ck). I adapted my recipe from the New York Times, who got its recipe from the Mohedano Restaurant in Caracas, Venezuela. You begin the entire process by browning off your roast in a dutch pan. Ck couldn't locate a bottom round roast, so I worked with the top shoulder roast he dropped off the night before. After that was done, I browned the leeks, onions and the rest in the pot.


 As the object of the game was to impress, I had to do candied nuts. After a careful inspection of all my recipes involving nuts, I settled on doing a variation of the famous Union Square Cafe nuts. As the meat browned, I popped the pecans into the oven. The recipe was a bit funny - the sugar went all runny and it appeared for a while that the nuts were cooking in sugar soup. Not so. The sugar seized when they were done and these, my dear, were delicious to nibble on as I finished doing dinner. It was difficult to save some for Ck.

I had decided on a meringue sort of dessert for the asado dinner. My meringue was mostly ok looking as I piped it out, but it wasn't perfectly perfect. Here's what it looked like going in.


There was far too much eggwhite leftover after piping the shape out, so I made the rest into little baby meringues while the leeks took their time to soften the way they should.

 
I made a little salad with baby tomatoes, artichokes, palm hearts and avocado with a simple lime and olive oil dressing. As the asado cooked in the oven for the requisite number of hours, the air filled with the acidic vapours of the vinegar. My eyes burned. No one warned me about this. However, let me assure you, it was well worth it. When the asado was nearly done, I popped a small pot of rice of the stove to serve with it.


And we finished off with a little sweet dessert - the chocolate meringue swirl topped with blueberries and fine little threads of orange peel, cooked very quickly with a bit of Cointreau and melted apricot jam.


Here's the recipe I used for Asado Negro with some of my notes:


1 cup white sugar
2 teaspoons brown sugar (I used a 3/4 cup of chopped up gula melaka or palm sugar instead of both sugars. You can also find piloncillo - unrefined cane sugar - at the Mexican House of Spice on Douglas Street in Victoria)
2 cups white-wine vinegar (don't be scared - you really do need all of this)
1 cup dry red wine
2 tablespoons canola oil
2 tablespoons unsalted butter
4 pounds beef bottom-round roast (or top round)
5 cloves garlic, peeled and smashed
1 large Spanish onion, peeled and thinly sliced
2 stalks celery, chopped
2 leeks, white and light-green parts only, washed well and thinly sliced
2 bay leaves
1⁄3 cup Worcestershire sauce
1 tablespoon soy sauce
Kosher salt and freshly ground black pepper
1 green bell pepper, stemmed, seeded and thinly sliced
1 red bell pepper, stemmed, seeded and thinly sliced


1. Preheat the oven to 375 degrees. Combine the white sugar and 1 cup of water in a heavy saucepan and cook, without stirring, over medium-high heat until the sugar dissolves and turns dark caramel, 8 to 10 minutes (don't need to do this for as long if you use gula melaka). Carefully add the brown sugar, vinegar and wine, and cook, stirring, until all the caramel has melted. Set aside.

2. Heat a Dutch oven large enough to hold the meat over medium-high heat. When hot, add the canola oil and butter. When these begin to shimmer and foam, sear the roast on all sides. Transfer the meat to a platter and set aside.

3. Add the garlic, onion, celery, leeks and bay leaves to the Dutch oven and cook over medium-high heat until they have softened and almost begun to brown. Add the Worcestershire and soy sauces and stir to incorporate, then return the meat to the pot and season with salt and pepper. Cover with the bell-pepper slices and pour the caramel sauce over the top. Cover, place in the oven and cook for approximately 2½ hours — basting and turning the meat every 45 minutes — until it is very tender.

4. Remove the meat and allow it to stand on a platter, tented in foil, for at least 30 minutes. If the sauce is not syrupy and thick, remove the vegetables (discard the bay leaves) and arrange them around the meat, then place the Dutch oven, uncovered, over medium-high heat and allow the sauce to reduce. My vegetables were almost melted, but the sauce was too runny. I cooked everything together on the stove and the result was this marvellous molten sauce.


5. When the sauce is ready, slice the meat and return it, along with the vegetables, to the sauce and reheat in the oven or, covered, on the stove. Check the seasoning. You're supposed to serve this garnished with cilantro, but I don't like it so I didn't do it.  Serves 6 to 8. 

Monday, May 9, 2011

Spherical Pancake Culture Collision: Gluten free Cashew Kunukku and Æbleskiver

That's right. Spherical pancakes. It's not a gimmick either. It's a global phenomenon. 

We recently acquired an Æbleskiver pan. To be a bit more precise and inject some cultural relevancy (to me), Ck acquired a kuzhi paniyaram pan (aka Æbleskiver pan - that's what they called it at the shop) and generously shared his new toy with me. Intrigued by this odd little pan and stories about my maternal grandmother making some sort of pancake like item in this pan, I got down to doing some serious food research. Pancakes are a very serious matter to me. They're among the easiest things to muck up and the most difficult things to do really well. After poking about for a bit, I discovered that this odd looking little pan is used in places like Holland, Scandanavia, and Denmark to make little pancakes called poffertjes (Dutch) or Æbleskiver (Danish). It's known as a monk's pan, pancake puff pan or an abelskiver pan in western shops.


Intrigued, we decided this Æbleskiver pan was the only appropriate thing to use for breakfast on Saturday. Note how shiny and new it looks here. My parents had given me some apples and Meyer lemons that were languishing away in my fridge. I chopped them up and made a sweet-sour-bitterish filling that was something between marmalade and apple butter.


We beat the poffertjes batter up and carefully dropped half spoons of it into the oiled, gleaming wells of the pan. They hissed satisfactorily. I quickly dropped a little spoonful of the apple-meyer lemon marmalade and then topped the little pancake up with batter until the well was three-quarters full. Adding the apple in the centre is a very traditional Danish approach to this, which I suppose makes what I did more Æbleskiver than poffertjes.


Learning how to cook them was a bit tricky. If you tried to flip them before they were properly golden on the pan belly side, they wouldn't budge. If you were careless with your fork (that was the first implement of choice), you'd ruin the shape of the uncooked top side. I dug about in my research and discovered a Danish recommendation to use a knitting needle for this task. I hauled out my bamboo knitting needle and hastily washed it up. It worked like a charm. We'd carefully push down on one cooked edge with the knitting needle and the Æbleskiver would somersault over with the greatest of ease.


The finished Æbleskiver or poffertje is not only a thing of beauty, it's also scrumptious.The dough is light and airy, and the centre filling (you can pick anything!) is a happy surprise to the tongue. I dusted the poffertjes with a bit of icing sugar to pretty them up a bit and to add a bit of sweetness to the bitter meyer lemon rind.


After experimenting with chocolate-filled poffertjes and plain poffertjes, I continued with my research. I came across interesting Japanese and Chinese versions of pancakes that use a very similar pan - Takoyaki and gai daan jai (eggette) respectively. I'll report out how those recipes turn out when I try them. 

As I was doing research on a totally unrelated topic one day, I stumbled across something quite extraordinary. I nearly fell off my chair. The abelskiver pan has its own name among Tamils who use it to make their own rounded golden delicacies - a kuzhi paniyaram pan. At that moment, it became clear to me that everyone loves pancakes. If nations and people can't agree about territorial sovereignty or global warming, by the gods, we can all agree about pancakes. 

Pancake love notwithstanding, this question remains: how did northern Europeans, East Asians and South Asians end up with very similar pans to make spherical pancakes? It's a good question. When I find out the answer, I'll let you know.


I found a brilliant recipe for cashew kunukku - think comfort food for rainy days or for days when you're too lazy to cook dinner but you want a quasi-substantial nibble and a movie. Kunukku was designed to be portable and is great for picnics. This dish is popular in South India, Sri Lanka and wherever there are Tamils with kuzhi paniyaram pans or deep vats of hot oil. Cashew kunukku is savory whereas Æbleskiver strays to the sweeter side of things as a result of the delightful things served with them. You could make a sweet variation of kunukku if you wanted to. I love both equally. 

I especially adore kunukku with some tomato chutney - it's one of my ideas of heaven. We made kunukku over at my parents' house and enjoyed them with some lovely tomato chutney and coconut chutney. Rather, I should say I ate too many kunukku at my parents' house and was too bug-eyed and full of kunukku and taro root to go to bed later.

Don't be worried when you see the ingredients for kunukku. They're easy to find in any Indian shop, extremely inexpensive, very healthy for you, and so easy to cook with. They're far more easy to work with than beating up egg whites for Æbleskiver, let me tell you. Be brave. Most importantly, have fun with it.
 
Æbleskiver Recipe (adapted from Lindgren's Bed & Breakfast in Lutsen, Minnesota)

4 separated eggs
2 tablespoons sugar
1/2 teaspoon salt
2 tablespoons vegetable oil
3/4 cup apple cider plus 1 cup yoghurt plus 1/4 cup water)
1 teaspoon baking soda
1 teaspoon baking powder
2 cups rice flour
oil

Method
 
1. Beat egg whites until stiff; set aside. 

2. Beat rest of ingredients until batter is very smooth. Fold in egg whites. 

3. Heat your pan over moderate heat with 1/8 teaspoon oil in each of the 7 holes. Fill each hole about three-quarters full with batter.

4. When browned on one side, turn with knitting needle [or two-tined fork] and keep turning until needle comes out clean after piercing through the cake. Generally, you'll only need to flip the cake once. 

5. Add a few drops of oil to each well in the pan before the next round of batter.

Serve with flavored butters, such as maple or cinnamon honey, syrup, jam and brown or white sugar.

Servings: plan on each person eating 7-10 cakes. Makes approximately 48 pancakes.


Cashew Kunukku (Sourced from Chef in You. Bless you, woman, for posting your marvellous recipes.)

2/3 cup plain short grained rice 
1/3 cup par boiled rice 
1 cup toor dal (pigeon peas) 
1/4 cup channa dal (bengal gram) 
1/4 cup whole urad dal (black gram) 
2-3 dried red chillies ( or as per taste) 
1/2 cup broken cashews 
1/2 tsp asafoetida (as per taste) 
1/4 cup grated coconut 
1-2 green chillies (optional) 
salt to taste 
few sprigs of curry leaves

Method

1. Wash the lentils and the rice in cold water. Then soak them along with dried chillies for at least 3 hours.

2. Drain the water from the soaked lentils and rice. Grind them with very little water along with coconut, salt and asafoetida to form a coarse batter.

3. Add the curry leaves, green chillies along with the broken cashew pieces. Stir well.

4. Meanwhile heat the pancake puff pan (kuzhi paniyaram pan) with 1/4 tsp of oil in each of the depressions. Drop spoonful of batter inside each of the holes.

5. Cook until the underside gets brown and then turn it upside down and cook for another 2-3 minutes. 

Test the first batch. It should be crunchy on the outside, but soft and bread-like on the inside. If it’s a bit dry, add a bit of water, and keep trotting along. I found I had to add a bit of water to my batch. The difference in texture that's achieved by adding a bit more water is significant, so do taste the first bunch you cook! I served these with coconut chutney.