That's right. Spherical pancakes. It's not a gimmick either. It's a global phenomenon.
We recently acquired an Æbleskiver pan. To be a bit more precise and inject some cultural relevancy (to me), Ck acquired a kuzhi paniyaram pan (aka Æbleskiver pan - that's what they called it at the shop) and generously shared his new toy with me. Intrigued by this odd little pan and stories about my maternal grandmother making some sort of pancake like item in this pan, I got down to doing some serious food research. Pancakes are a very serious matter to me. They're among the easiest things to muck up and the most difficult things to do really well. After poking about for a bit, I discovered that this odd looking little pan is used in places like Holland, Scandanavia, and Denmark to make little pancakes called poffertjes (Dutch) or Æbleskiver (Danish). It's known as a monk's pan, pancake puff pan or an abelskiver pan in western shops.
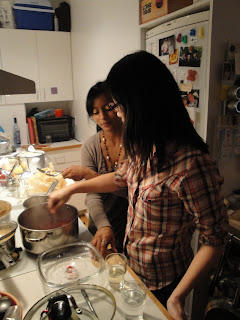
Intrigued, we decided this Æbleskiver pan was the only appropriate thing to use for breakfast on Saturday. Note how shiny and new it looks here. My parents had given me some apples and Meyer lemons that were languishing away in my fridge. I chopped them up and made a sweet-sour-bitterish filling that was something between marmalade and apple butter.
We recently acquired an Æbleskiver pan. To be a bit more precise and inject some cultural relevancy (to me), Ck acquired a kuzhi paniyaram pan (aka Æbleskiver pan - that's what they called it at the shop) and generously shared his new toy with me. Intrigued by this odd little pan and stories about my maternal grandmother making some sort of pancake like item in this pan, I got down to doing some serious food research. Pancakes are a very serious matter to me. They're among the easiest things to muck up and the most difficult things to do really well. After poking about for a bit, I discovered that this odd looking little pan is used in places like Holland, Scandanavia, and Denmark to make little pancakes called poffertjes (Dutch) or Æbleskiver (Danish). It's known as a monk's pan, pancake puff pan or an abelskiver pan in western shops.
 |
Intrigued, we decided this Æbleskiver pan was the only appropriate thing to use for breakfast on Saturday. Note how shiny and new it looks here. My parents had given me some apples and Meyer lemons that were languishing away in my fridge. I chopped them up and made a sweet-sour-bitterish filling that was something between marmalade and apple butter.
We beat the poffertjes batter up and carefully dropped half spoons of it into the oiled, gleaming wells of the pan. They hissed satisfactorily. I quickly dropped a little spoonful of the apple-meyer lemon marmalade and then topped the little pancake up with batter until the well was three-quarters full. Adding the apple in the centre is a very traditional Danish approach to this, which I suppose makes what I did more Æbleskiver than poffertjes.
Learning how to cook them was a bit tricky. If you tried to flip them before they were properly golden on the pan belly side, they wouldn't budge. If you were careless with your fork (that was the first implement of choice), you'd ruin the shape of the uncooked top side. I dug about in my research and discovered a Danish recommendation to use a knitting needle for this task. I hauled out my bamboo knitting needle and hastily washed it up. It worked like a charm. We'd carefully push down on one cooked edge with the knitting needle and the Æbleskiver would somersault over with the greatest of ease.
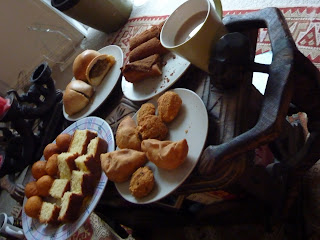
The finished Æbleskiver or poffertje is not only a thing of beauty, it's also scrumptious.The dough is light and airy, and the centre filling (you can pick anything!) is a happy surprise to the tongue. I dusted the poffertjes with a bit of icing sugar to pretty them up a bit and to add a bit of sweetness to the bitter meyer lemon rind.

After experimenting with chocolate-filled poffertjes and plain poffertjes, I continued with my research. I came across interesting Japanese and Chinese versions of pancakes that use a very similar pan - Takoyaki and gai daan jai (eggette) respectively. I'll report out how those recipes turn out when I try them.
As I was doing research on a totally unrelated topic one day, I stumbled across something quite extraordinary. I nearly fell off my chair. The abelskiver pan has its own name among Tamils who use it to make their own rounded golden delicacies - a kuzhi paniyaram pan. At that moment, it became clear to me that everyone loves pancakes. If nations and people can't agree about territorial sovereignty or global warming, by the gods, we can all agree about pancakes.
Pancake love notwithstanding, this question remains: how did northern Europeans, East Asians and South Asians end up with very similar pans to make spherical pancakes? It's a good question. When I find out the answer, I'll let you know.
I found a brilliant recipe for cashew kunukku - think comfort food for rainy days or for days when you're too lazy to cook dinner but you want a quasi-substantial nibble and a movie. Kunukku was designed to be portable and is great for picnics. This dish is popular in South India, Sri Lanka and wherever there are Tamils with kuzhi paniyaram pans or deep vats of hot oil. Cashew kunukku is savory whereas Æbleskiver strays to the sweeter side of things as a result of the delightful things served with them. You could make a sweet variation of kunukku if you wanted to. I love both equally.
I especially adore kunukku with some tomato chutney - it's one of my ideas of heaven. We made kunukku over at my parents' house and enjoyed them with some lovely tomato chutney and coconut chutney. Rather, I should say I ate too many kunukku at my parents' house and was too bug-eyed and full of kunukku and taro root to go to bed later.
Don't be worried when you see the ingredients for kunukku. They're easy to find in any Indian shop, extremely inexpensive, very healthy for you, and so easy to cook with. They're far more easy to work with than beating up egg whites for Æbleskiver, let me tell you. Be brave. Most importantly, have fun with it.
Æbleskiver Recipe (adapted from Lindgren's Bed & Breakfast in Lutsen, Minnesota)
4 separated eggs
2 tablespoons sugar
1/2 teaspoon salt
2 tablespoons vegetable oil
3/4 cup apple cider plus 1 cup yoghurt plus 1/4 cup water)
1 teaspoon baking soda
1 teaspoon baking powder
2 cups rice flour
oil
2 tablespoons sugar
1/2 teaspoon salt
2 tablespoons vegetable oil
3/4 cup apple cider plus 1 cup yoghurt plus 1/4 cup water)
1 teaspoon baking soda
1 teaspoon baking powder
2 cups rice flour
oil
Method
1. Beat egg whites until stiff; set aside.
2. Beat rest of ingredients until batter is very smooth. Fold in egg whites.
3. Heat your pan over moderate heat with 1/8 teaspoon oil in each of the 7 holes. Fill each hole about three-quarters full with batter.
4. When browned on one side, turn with knitting needle [or two-tined fork] and keep turning until needle comes out clean after piercing through the cake. Generally, you'll only need to flip the cake once.
5. Add a few drops of oil to each well in the pan before the next round of batter.
Serve with flavored butters, such as maple or cinnamon honey, syrup, jam and brown or white sugar.
Servings: plan on each person eating 7-10 cakes. Makes approximately 48 pancakes.
Cashew Kunukku (Sourced from Chef in You. Bless you, woman, for posting your marvellous recipes.)
2/3 cup plain short grained rice
1/3 cup par boiled rice
1 cup toor dal (pigeon peas)
1/4 cup channa dal (bengal gram)
1/4 cup whole urad dal (black gram)
2-3 dried red chillies ( or as per taste)
1/2 cup broken cashews
1/2 tsp asafoetida (as per taste)
1/4 cup grated coconut
1-2 green chillies (optional)
salt to taste
few sprigs of curry leaves
Method
1. Wash the lentils and the rice in cold water. Then soak them along with dried chillies for at least 3 hours.
2. Drain the water from the soaked lentils and rice. Grind them with very little water along with coconut, salt and asafoetida to form a coarse batter.
3. Add the curry leaves, green chillies along with the broken cashew pieces. Stir well.
4. Meanwhile heat the pancake puff pan (kuzhi paniyaram pan) with 1/4 tsp of oil in each of the depressions. Drop spoonful of batter inside each of the holes.
5. Cook until the underside gets brown and then turn it upside down and cook for another 2-3 minutes.
Test the first batch. It should be crunchy on the outside, but soft and bread-like on the inside. If it’s a bit dry, add a bit of water, and keep trotting along. I found I had to add a bit of water to my batch. The difference in texture that's achieved by adding a bit more water is significant, so do taste the first bunch you cook! I served these with coconut chutney.


