Tuesday, September 27, 2011

Seduction by Dinner: Asado Negro with a Salad of Palm hearts and Avocado


Tamils say love begins in the eyes. We have terms of endearment that involve use of the word "eye." It's the same with Mandarin. I suspect other languages probably make the linkage between the eyes and love - even English does with its idiomatic phrase "apple of my eye." It's not particularly fair to people who can't physically see, but maybe it's the metaphysical eye they're talking about. The third eye that sees things your physical eyes cannot.

I think this plate of asado definitely inspires fierce love even though the photograph hardly does justice to all the other things about asado that appeal to the senses - the long wait while it transforms into something divine, the intensely aromatic waft of slow-cooked meat, caramelized vegetables and vinegar cooked down to a muted punch. Asado is the best pot roast you could ever eat - the meat is perfectly tender, the texture is heavenly, and the darkened, fulsome and robust flavour of all the things it's cooked with goes right to the centre of each bite. It defies description.

Inspired by my recent return from South America and its extraordinary parrilla restaurants (grilled meat restaurants) and mighty outdoor chivito (baby goat) fire-side grills, this blog post is about my first attempt to make asado negro (black roast). Asado is a generic term for a range of barbecue techniques or can be used as a verb to describe having or attending a barbecue. 

More importantly, it's easy to make and as long as you don't let on, you'll come across as an absolute culinary genius when you serve this to your closest friends with some strong dark beer or a decent zinfandel (or Malbec).


Cooking asado negro is a process that requires a bit of committment. It's the sort of recipe you tinker with on a Sunday afternoon while you drink a fine Chilean wine, or one you frantically prepare on a Friday afternoon to impress someone (in my case, Ck). I adapted my recipe from the New York Times, who got its recipe from the Mohedano Restaurant in Caracas, Venezuela. You begin the entire process by browning off your roast in a dutch pan. Ck couldn't locate a bottom round roast, so I worked with the top shoulder roast he dropped off the night before. After that was done, I browned the leeks, onions and the rest in the pot.


 As the object of the game was to impress, I had to do candied nuts. After a careful inspection of all my recipes involving nuts, I settled on doing a variation of the famous Union Square Cafe nuts. As the meat browned, I popped the pecans into the oven. The recipe was a bit funny - the sugar went all runny and it appeared for a while that the nuts were cooking in sugar soup. Not so. The sugar seized when they were done and these, my dear, were delicious to nibble on as I finished doing dinner. It was difficult to save some for Ck.

I had decided on a meringue sort of dessert for the asado dinner. My meringue was mostly ok looking as I piped it out, but it wasn't perfectly perfect. Here's what it looked like going in.


There was far too much eggwhite leftover after piping the shape out, so I made the rest into little baby meringues while the leeks took their time to soften the way they should.

 
I made a little salad with baby tomatoes, artichokes, palm hearts and avocado with a simple lime and olive oil dressing. As the asado cooked in the oven for the requisite number of hours, the air filled with the acidic vapours of the vinegar. My eyes burned. No one warned me about this. However, let me assure you, it was well worth it. When the asado was nearly done, I popped a small pot of rice of the stove to serve with it.


And we finished off with a little sweet dessert - the chocolate meringue swirl topped with blueberries and fine little threads of orange peel, cooked very quickly with a bit of Cointreau and melted apricot jam.


Here's the recipe I used for Asado Negro with some of my notes:


1 cup white sugar
2 teaspoons brown sugar (I used a 3/4 cup of chopped up gula melaka or palm sugar instead of both sugars. You can also find piloncillo - unrefined cane sugar - at the Mexican House of Spice on Douglas Street in Victoria)
2 cups white-wine vinegar (don't be scared - you really do need all of this)
1 cup dry red wine
2 tablespoons canola oil
2 tablespoons unsalted butter
4 pounds beef bottom-round roast (or top round)
5 cloves garlic, peeled and smashed
1 large Spanish onion, peeled and thinly sliced
2 stalks celery, chopped
2 leeks, white and light-green parts only, washed well and thinly sliced
2 bay leaves
1⁄3 cup Worcestershire sauce
1 tablespoon soy sauce
Kosher salt and freshly ground black pepper
1 green bell pepper, stemmed, seeded and thinly sliced
1 red bell pepper, stemmed, seeded and thinly sliced


1. Preheat the oven to 375 degrees. Combine the white sugar and 1 cup of water in a heavy saucepan and cook, without stirring, over medium-high heat until the sugar dissolves and turns dark caramel, 8 to 10 minutes (don't need to do this for as long if you use gula melaka). Carefully add the brown sugar, vinegar and wine, and cook, stirring, until all the caramel has melted. Set aside.

2. Heat a Dutch oven large enough to hold the meat over medium-high heat. When hot, add the canola oil and butter. When these begin to shimmer and foam, sear the roast on all sides. Transfer the meat to a platter and set aside.

3. Add the garlic, onion, celery, leeks and bay leaves to the Dutch oven and cook over medium-high heat until they have softened and almost begun to brown. Add the Worcestershire and soy sauces and stir to incorporate, then return the meat to the pot and season with salt and pepper. Cover with the bell-pepper slices and pour the caramel sauce over the top. Cover, place in the oven and cook for approximately 2½ hours — basting and turning the meat every 45 minutes — until it is very tender.

4. Remove the meat and allow it to stand on a platter, tented in foil, for at least 30 minutes. If the sauce is not syrupy and thick, remove the vegetables (discard the bay leaves) and arrange them around the meat, then place the Dutch oven, uncovered, over medium-high heat and allow the sauce to reduce. My vegetables were almost melted, but the sauce was too runny. I cooked everything together on the stove and the result was this marvellous molten sauce.


5. When the sauce is ready, slice the meat and return it, along with the vegetables, to the sauce and reheat in the oven or, covered, on the stove. Check the seasoning. You're supposed to serve this garnished with cilantro, but I don't like it so I didn't do it.  Serves 6 to 8. 

Monday, May 9, 2011

Spherical Pancake Culture Collision: Gluten free Cashew Kunukku and Æbleskiver

That's right. Spherical pancakes. It's not a gimmick either. It's a global phenomenon. 

We recently acquired an Æbleskiver pan. To be a bit more precise and inject some cultural relevancy (to me), Ck acquired a kuzhi paniyaram pan (aka Æbleskiver pan - that's what they called it at the shop) and generously shared his new toy with me. Intrigued by this odd little pan and stories about my maternal grandmother making some sort of pancake like item in this pan, I got down to doing some serious food research. Pancakes are a very serious matter to me. They're among the easiest things to muck up and the most difficult things to do really well. After poking about for a bit, I discovered that this odd looking little pan is used in places like Holland, Scandanavia, and Denmark to make little pancakes called poffertjes (Dutch) or Æbleskiver (Danish). It's known as a monk's pan, pancake puff pan or an abelskiver pan in western shops.


Intrigued, we decided this Æbleskiver pan was the only appropriate thing to use for breakfast on Saturday. Note how shiny and new it looks here. My parents had given me some apples and Meyer lemons that were languishing away in my fridge. I chopped them up and made a sweet-sour-bitterish filling that was something between marmalade and apple butter.


We beat the poffertjes batter up and carefully dropped half spoons of it into the oiled, gleaming wells of the pan. They hissed satisfactorily. I quickly dropped a little spoonful of the apple-meyer lemon marmalade and then topped the little pancake up with batter until the well was three-quarters full. Adding the apple in the centre is a very traditional Danish approach to this, which I suppose makes what I did more Æbleskiver than poffertjes.


Learning how to cook them was a bit tricky. If you tried to flip them before they were properly golden on the pan belly side, they wouldn't budge. If you were careless with your fork (that was the first implement of choice), you'd ruin the shape of the uncooked top side. I dug about in my research and discovered a Danish recommendation to use a knitting needle for this task. I hauled out my bamboo knitting needle and hastily washed it up. It worked like a charm. We'd carefully push down on one cooked edge with the knitting needle and the Æbleskiver would somersault over with the greatest of ease.


The finished Æbleskiver or poffertje is not only a thing of beauty, it's also scrumptious.The dough is light and airy, and the centre filling (you can pick anything!) is a happy surprise to the tongue. I dusted the poffertjes with a bit of icing sugar to pretty them up a bit and to add a bit of sweetness to the bitter meyer lemon rind.


After experimenting with chocolate-filled poffertjes and plain poffertjes, I continued with my research. I came across interesting Japanese and Chinese versions of pancakes that use a very similar pan - Takoyaki and gai daan jai (eggette) respectively. I'll report out how those recipes turn out when I try them. 

As I was doing research on a totally unrelated topic one day, I stumbled across something quite extraordinary. I nearly fell off my chair. The abelskiver pan has its own name among Tamils who use it to make their own rounded golden delicacies - a kuzhi paniyaram pan. At that moment, it became clear to me that everyone loves pancakes. If nations and people can't agree about territorial sovereignty or global warming, by the gods, we can all agree about pancakes. 

Pancake love notwithstanding, this question remains: how did northern Europeans, East Asians and South Asians end up with very similar pans to make spherical pancakes? It's a good question. When I find out the answer, I'll let you know.


I found a brilliant recipe for cashew kunukku - think comfort food for rainy days or for days when you're too lazy to cook dinner but you want a quasi-substantial nibble and a movie. Kunukku was designed to be portable and is great for picnics. This dish is popular in South India, Sri Lanka and wherever there are Tamils with kuzhi paniyaram pans or deep vats of hot oil. Cashew kunukku is savory whereas Æbleskiver strays to the sweeter side of things as a result of the delightful things served with them. You could make a sweet variation of kunukku if you wanted to. I love both equally. 

I especially adore kunukku with some tomato chutney - it's one of my ideas of heaven. We made kunukku over at my parents' house and enjoyed them with some lovely tomato chutney and coconut chutney. Rather, I should say I ate too many kunukku at my parents' house and was too bug-eyed and full of kunukku and taro root to go to bed later.

Don't be worried when you see the ingredients for kunukku. They're easy to find in any Indian shop, extremely inexpensive, very healthy for you, and so easy to cook with. They're far more easy to work with than beating up egg whites for Æbleskiver, let me tell you. Be brave. Most importantly, have fun with it.
 
Æbleskiver Recipe (adapted from Lindgren's Bed & Breakfast in Lutsen, Minnesota)

4 separated eggs
2 tablespoons sugar
1/2 teaspoon salt
2 tablespoons vegetable oil
3/4 cup apple cider plus 1 cup yoghurt plus 1/4 cup water)
1 teaspoon baking soda
1 teaspoon baking powder
2 cups rice flour
oil

Method
 
1. Beat egg whites until stiff; set aside. 

2. Beat rest of ingredients until batter is very smooth. Fold in egg whites. 

3. Heat your pan over moderate heat with 1/8 teaspoon oil in each of the 7 holes. Fill each hole about three-quarters full with batter.

4. When browned on one side, turn with knitting needle [or two-tined fork] and keep turning until needle comes out clean after piercing through the cake. Generally, you'll only need to flip the cake once. 

5. Add a few drops of oil to each well in the pan before the next round of batter.

Serve with flavored butters, such as maple or cinnamon honey, syrup, jam and brown or white sugar.

Servings: plan on each person eating 7-10 cakes. Makes approximately 48 pancakes.


Cashew Kunukku (Sourced from Chef in You. Bless you, woman, for posting your marvellous recipes.)

2/3 cup plain short grained rice 
1/3 cup par boiled rice 
1 cup toor dal (pigeon peas) 
1/4 cup channa dal (bengal gram) 
1/4 cup whole urad dal (black gram) 
2-3 dried red chillies ( or as per taste) 
1/2 cup broken cashews 
1/2 tsp asafoetida (as per taste) 
1/4 cup grated coconut 
1-2 green chillies (optional) 
salt to taste 
few sprigs of curry leaves

Method

1. Wash the lentils and the rice in cold water. Then soak them along with dried chillies for at least 3 hours.

2. Drain the water from the soaked lentils and rice. Grind them with very little water along with coconut, salt and asafoetida to form a coarse batter.

3. Add the curry leaves, green chillies along with the broken cashew pieces. Stir well.

4. Meanwhile heat the pancake puff pan (kuzhi paniyaram pan) with 1/4 tsp of oil in each of the depressions. Drop spoonful of batter inside each of the holes.

5. Cook until the underside gets brown and then turn it upside down and cook for another 2-3 minutes. 

Test the first batch. It should be crunchy on the outside, but soft and bread-like on the inside. If it’s a bit dry, add a bit of water, and keep trotting along. I found I had to add a bit of water to my batch. The difference in texture that's achieved by adding a bit more water is significant, so do taste the first bunch you cook! I served these with coconut chutney.


Friday, March 11, 2011

Kicking boring oatmeal in the teeth: Lemongrass infused oatmeal

I swore a solemn oath to myself at the beginning of this year. I have a fat hot pink binder full of recipes I've collected from the vast stretches of cyberspace. They're meticulously indexed by recipe type, and I swear I'm writing up a proper index to show at a glance what's in each section. I swore that I'd work through every recipe this year, and wouldn't, on the pain of gastronomic shame, repeat a single dish, no matter how much I love it.

This was the oath I fecklessly swore to myself at the beginning of this year. It was a dangerous oath for someone like me to take. I already have a habit of listening to a favourite song on loop. On top of that, I love, absolutely love my trashy quick dinner of frozen chipped hashbrowns pan fried up with frozen vegetables and a muddled egg. It's my comfort food go to. I adore my chips, ribena mixed with soda water and the frosted flakes (not all at the same time!). All these vices involve repeats depending on the weather, my mood, and whether anyone else is around to witness the food debauchery. On the other hand, I also love a fine lamb biriyani, a steaming bowl of tom yum goong or the always elegant sole meunière. There's tyranny in only worshipping the divine. I like the profane things too.

The beginning of the calendar year is always a good time to plot future projects. For instance, I was checking out madame tigress' blog and saw her recipe for confiture des vieux garcon. By a fortunate stroke of luck, I managed to find a vintage rumtopf/pickling jar. A future post is coming up as soon as the first fruits of the season come in.
 

Now onto the subject at hand.  I've been finding ways to subvert the deeply ingrained boredom that generally accompanies a bowl of morning oatmeal. I began with the simple addition of some of the peach marmalade I made last summer. I just chucked in a tablespoon and a bit of it into the pot as the marmalade cooked. Delicious.


Then I took some blueberries I froze last summer and plopped a few of those in with a dollop of honey, some ground flaxseed and some freshly grated nutmeg. The main thing is to incorporate your flavours while the oatmeal is still cooking. I loved the vivid colours of this bowl. and its velvety sweet blueberry flavour. This particular variation of oatmeal was inspired by Lottie and Doof's breakfast porridge.

We experimented like madmen. We added candied ginger with fresh apple pieces and Saigon cinnamon to the oatmeal pot another morning. Flaxseed meal. Lots of it. Luscious atulfo mango with dried ginger and brown sugar. Blueberry with dessicated coconut and sliced almonds. The version I'm going to give you the recipe for excited me so much that I forgot to take a picture of it.  It's a great way to use up those ends and bits of lemon grass leftover from making a lovely Thai, Indonesian or Malay dinner.  We licked the backs of our spoons, examined the pot for more and then resigned ourselves to sipping tea and watching the local elderly people take their morning consititutional stroll.

Lemongrass Infused Oatmeal

1 3/4 cups of cold water
1 really good pinch of salt. I used kosher salt.
1 cup of large flake oats (the yellow label on the Quaker packet or the sort that take about 10 - 15 minutes to cook)
1 - 2 teaspoons of flaxseed meal (or ground flaxseed)
3 inch piece of lemon grass bashed up with the flat of your knife
1/2 a very ripe banana, smashed with a fork
1/2 cup chopped fresh strawberries
1 - 2 tablespoons of honey, depending on how sweet you like your oatmeal

 Method

1. Bring the water to boil in a medium sauce pan with the lemon grass. Chuck the salt in.

2. Drop the oats into the boiling water. Cover the pot with the lid cracked open. Give it a bit of a stir, but don't fuss about it too much. Add the ground flaxseeds or flaxseed meal.

3.  After five minutes, add the banana, strawberries and honey. Stir occasionally to ensure the oatmeal doesn't stick to the bottom of the pot and burn. Cook to the desired consistency. I like my oatmeal fairly stiff, but Ck likes his a bit more fast and loose.

Do you have your own oatmeal variations? Do tell and share!

My Mother's Malaysian-Sri Lankan Style Tomato Omelette


My mother's Malaysian/Sri Lankan style tomato omelette is a staple in our household. It's go-to comfort food, it's the food you make when you're too tired to come up with a fussily cooked protein source for dinner, and with all that, it's damn good. Mom made it for Ck and I a little while ago when we stopped by after work, famished and exhausted. 

You start by chopping up some white onion, spring onion, a bit of tomato, a bit of shallot, a bit of garlic and a bit of ginger. Chuck it all into a nice frying pan that's got a bit of oil in it. Add a dried chili if you like. Fry it up until the onion is translucent and the tomato has softened up.


Beat a few eggs up in a bowl, temper it with a bit of cold water (it makes your eggs lovely and fluffy), salt, white pepper and whatever spice you like. You can add a bit of chili powder to give your omelette a kick. In true Malaysian-Sri Lankan homecooking style, Mom cuts her omelette up into four and flips it over to give it last bit of a cook.


Serve with hot rice, a vegetable side and you've got a fabulous light weeknight supper!


Tuesday, March 1, 2011

On the Subject of Winter Produce: Persimmon Cake


Dear readers, I have a great deal of catch up to do and a significant number of stories that need to be told about the pictures I've been taking for the last few months. We'll start with persimmons and fast forward to the present. This will include tales about asado negro and how my eyes wept from the vinegared fumes, to preserved lemons and the furious pounding of cherry pits for sour cherry liqueur. But back to the persimmons. My parents went a bit mad buying persimmons back when Victoria was teetering on the cusp of winter. They ended up sharing some of the spoils of these persimmon shopping trips with me.


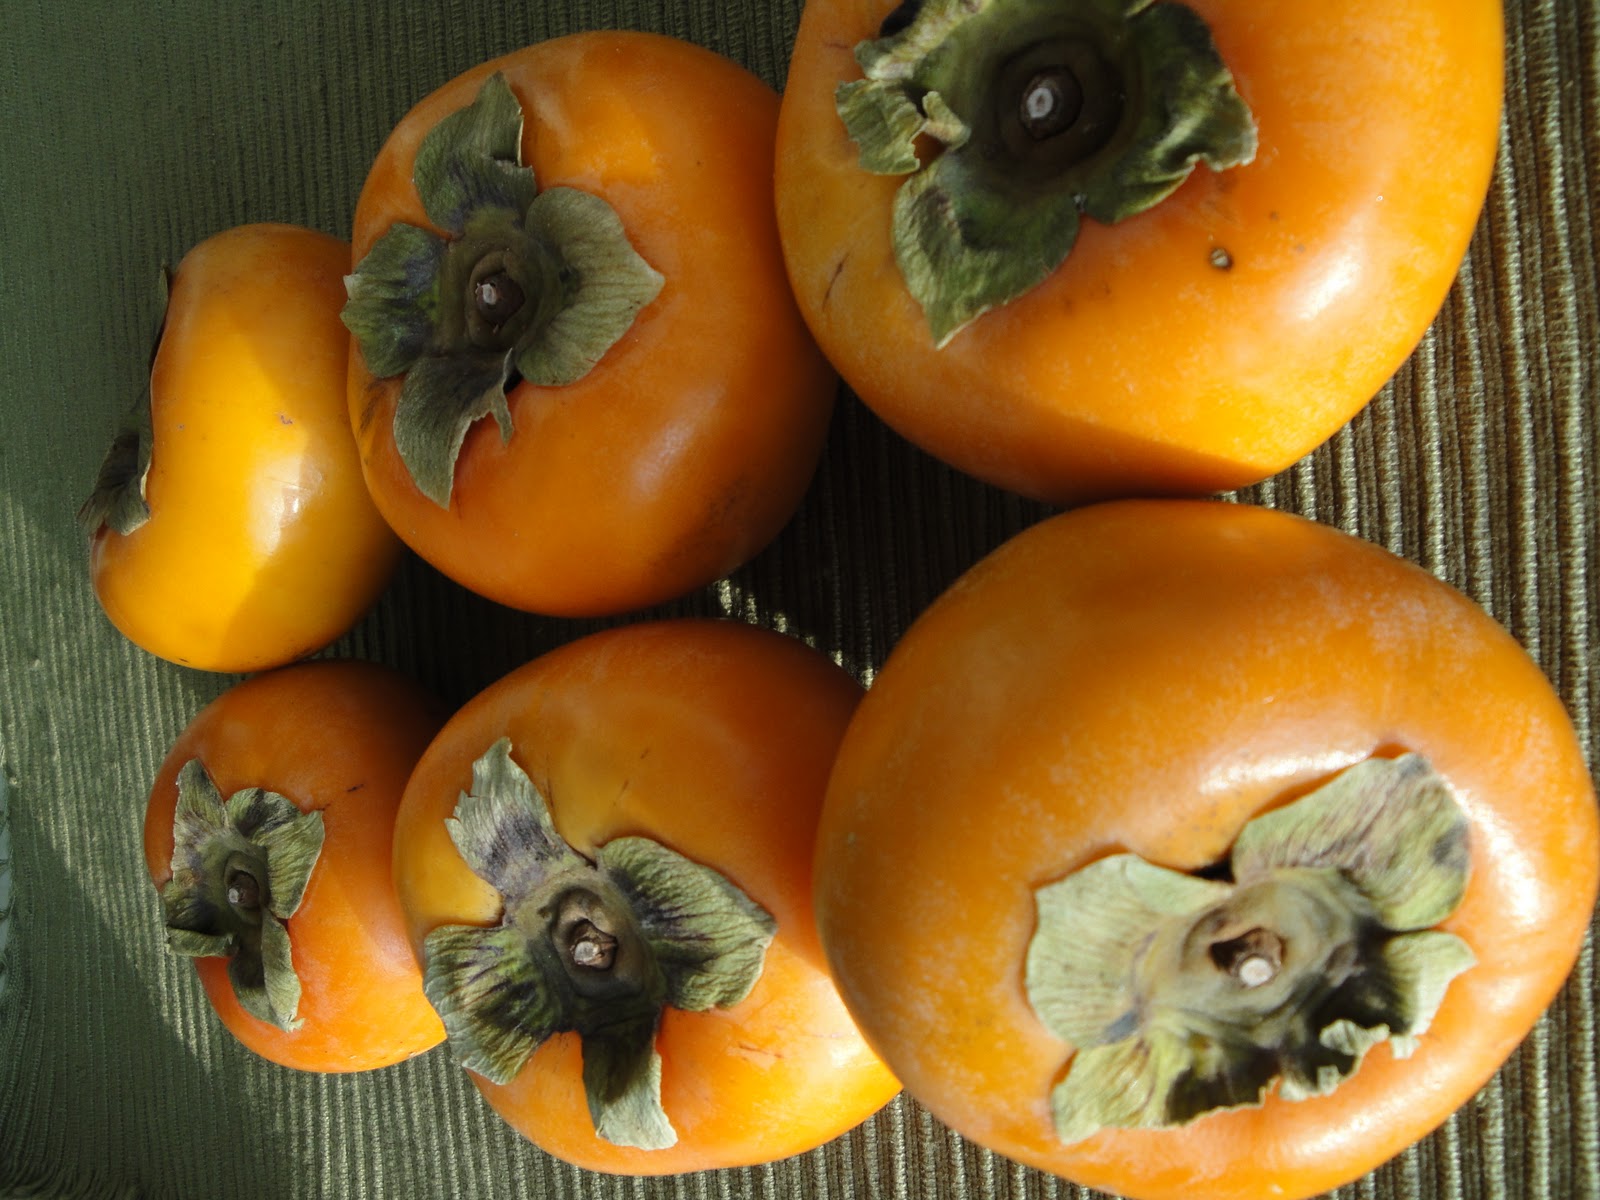
There are two kinds of persimmons - the astringent (e.g. hachiya) and the non-astringent kind (e.g. fuyu). Both types are high in fibre, contain tannins and are supposed to be good for your heart. The heart-shaped hachiya persimmon is not pictured here because in my haste to mash it into a pulp, I forgot to take a picture.

Unless you like furry tasting fruit, for consumption, the hachiya has to be ripe, so ripe that its skin becomes translucent and the fruit feels almost like mush. You can blet persimmons by simply putting them out in sunlight or by wrapping them in paper. My hachiya lived in my kitchen so it was alternately exposed to sunlight and temperatures hovering around zero. The tomato-shaped persimmons pictured here are the fuyu variation. The fuyu persimmon can be eaten when it's quite firm, and it's still lovely to eat even when it has ripened into a supple softness.


Persimmons can be eaten fresh, dried or cooked. I prefer the persimmon when it's still firm. I'm not generally a huge fan of mushy fruits although I did recently try a grenadilla and instantly fell in love with its crunchy seeds and sweet viscous flesh. Since my hachiya had ripened into the golden pulped treasure pictured above, I decided to make cake with it.

As for the rest of the fuyus, I made a darkly spiced persimmon paste out of them and froze it. I have plans for this paste. It will likely be used at some not too distant point in the future for meat dishes and perhaps another cake. Here's my recipe that I adapted from Fresh Approach Cooking:

Persimmon Cake
1 to 2 very ripe hachiya persimmons, yielding about 1 cup fork-mashed pulp
1 teaspoon baking soda
1 teaspoon baking powder
1 1/2 cups unsifted rice flour
1 tsp xanthan gum
1/2 tsp guar gum
1 tsp cinnamon
1/2 tsp each fresh nutmeg and ground cloves
3/4 cup butter
½ cup white sugar
½ cup brown sugar
1 egg
½ cup balkan style yoghurt, slightly diluted
1 tsp orange zest

Method:
 
1. Preheat oven to 350F.

2. Fork mash the persimmon into a pulp. Don't worry if it isn't perfectly smooth.

3. Sift together the flour, xanthan and guar gum, baking soda, baking powder, nutmeg, cloves and cinnamon.

4. In an large bowl, beat butter and sugar until fluffy for about 3 minutes. Add the egg and combine well. Add the persimmon pulp. Add half the flour mix and mix to just combine.

5. Add the yoghurt. Add the remaining flour and stir until it just comes together, then stir in the orange zest.

6. Grease your baking pan of choice with butter. You can use a bundt pan or cake ring or 9 inch cake pan. Spoon the batter in and bake for 45 minutes or more until knife comes out clean. Allow to cool in the pan for 10 minutes, then invert onto a platter to cool completely.

This is best served slightly warm. Before serving, dust lightly with powdered sugar. I loved eating this cake for breakfast!

Saturday, January 22, 2011

Food for Political Discussions and Tight Budgets: Tunisian Tuna Frittata

I'm going to confess. I'm rather smitten. Although the state of being actively smitten has done nothing to arrest the amount of cooking in my kitchen - in fact, it has increased it - I find my blog has suffered a serious lack of attention. I considered this abdication from diligent writing and the cause thereof. The cause is known to my friends as Ck. A man who can interrupt Luscious Domestic blogging activity surely merits that mention before I launch into a telling of the Tunisian Tuna Frittata.

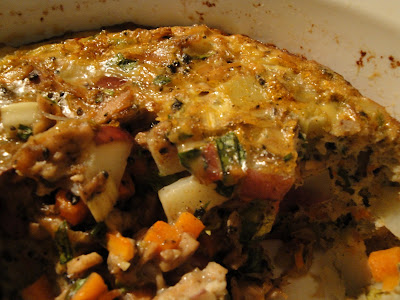
This fritatta seems especially timely given the significant upheaval happening in Tunisia in the last few weeks. Unlike the complexity of the political happenings there, this tuna frittata is not only brilliantly simple, it's divinely tasty and a clever way to make an economical one dish meal on a hectic weeknight. I had found this recipe in the New York Times some time ago and had been waiting to make it for some time.


I decided to make this dish for a very beloved friend and old acquaintance one wintry night not so long ago. Nathan is the sort of friend who possesses an unusual thoughtfulness and perception, which is an excellent asset in a friend on a regular basis, but is especially valuable when you require a minister of war. He also has fantastic taste in music and is a fairly adventurous sort. I was feeling rather tired after a day of driving my mouse, working for the fine people of British Columbia. Tunisian Tuna Frittata it had to be. 


Now don't get fussed when you see the ingredients below for things like harissa and caraway seeds. Harissa is a chili paste that's generally made from Piri Piri chili peppers or whatever chili pepper is on hand, blended with olive oil. It comes in wee little tins and is a standard element of North African cooking (places like Algeria and Tunisia but not so much in Morocco). It's not expensive at all and it's not particularly spicy. It's not nearly as hot as sambal olek but it is distinctive tasting. I would not recommend trying to replace it with whatever chili sauce you have on hand. I doubled the amount of harrisa specified in the recipe and found it quite pleasant.

Caraway is also quite distinctive in its flavour and shouldn't be replaced either. Caraway is also known as Persian cumin. Its seeds are decidedly black and lend a lovely anise-like flavour to foods. It's a key element in rye bread, it's found in a number of European foods (Akvavit and Havarti cheese are the most notable), and it's also used in this frittata. You can find caraway seeds and harrisa at Middle Eastern food shops. I found both these items at the Blair Mart on Pandora Street in Victoria.

I highly recommend grinding whole caraway seeds for this recipe. I'd also strongly suggest using tuna that's packed in light olive oil, not water. The tuna that's packed in water tends to dry out and its flavour is significantly diminished. Lastly, don't be shy about the salt and use good eggs. Good eggs make a significant difference in the final product. If you can get your hands on local farm eggs, do so!

We demolished a good part of the frittata before we abandoned it to nibble on the persimmon cake I whipped up prior to the business of frittata making. I'll definitely share the recipe for that cake with you in the next post. The leftovers - if there are any to be had - are very portable and make a great lunch. I tried eating it cold, and it suited me just fine. But then again, I like cold frittata. Do try this recipe. It's wonderful comfort food on a cold mid-winter night and a happy addition to your lunch box.


Ingredients

1/2 pound boiling potatoes, peeled and cut in small dice (about 1/2 inch)
3/4 pound carrots, peeled and cut in small dice (about 1/2 inch)
2 tablespoons extra virgin olive oil
2 large garlic cloves, mashed with a pinch of salt in a mortar and pestle or finely chopped
2 teaspoons caraway seeds, ground
Salt and freshly ground pepper to taste
2 tablespoons harissa dissolved in 2 tablespoons water, or 1/4 to 1/2 teaspoon cayenne (to taste)
1 6-ounce can of olive oil-packed light tuna (not albacore), drained and broken up with a fork
                                                                                      1/4 cup finely chopped flat-leaf parsley
                                                                                      8 large eggs

Method
 
1. Preheat the oven to 350 degrees. Steam the potatoes and carrots above 1 inch of boiling water until tender, about 10 minutes.

2. Place the oil in a 2-quart baking dish or a 9-inch cast iron skillet. Rub the oil over the sides of the pan, and place in the oven. Meanwhile, whisk the eggs in a large bowl. Whisk in garlic, caraway, salt (about 1/2 teaspoon) and pepper to taste and harissa. Stir in the potatoes, carrots, tuna and parsley. Remove the baking dish from the oven, scrape the egg mixture into the hot baking dish and place in the oven.

3. Bake 30 to 35 minutes until lightly colored on the top and set. Allow to cool for 10 minutes or longer before serving. Serve warm or at room temperature.

Yield: Serves six to eight.

Tuesday, January 11, 2011

Sunday Morning Granola


One morning, after taking advantage of the morning light to photograph "the twins" - the newly-filtered cherry liqueur and the orange peel liqueur, I realized it was time to start Sunday breakfast. I abandoned my plan to continue reading my copy of Ottolenghi's brilliant cookbook, and wandered into the kitchen.

The twins posing on Ottolenghi's cookbook.

We hadn't partied or entertained the night before, so a full on breakfast of eggs, hashbrowns, bacon seemed excessive. Oatmeal seemed like the stuff for work mornings and camping weekends. It had to be granola.

I'll be honest, I'm not too crazy about sprouting mung beans or any of the other hippy things I was surrounded with when growing up on the west coast of Canada. For the longest time, I lumped granola in with the rest of the foods I associated the word "hippy" with. To my uninitiated palate, these foods seemed flavourless, perhaps even joyless.

However, granola has quickly become mainstream in the last decade, with wee but fashionable boxes of the stuff demanding high prices. I will admit that my palate and appreciation for granola evolved in step with the mainstream trend. Many boxes of commercially available granola usually have some form of wheat or gluten in it. Between the allergies, being too lazy to walk to the store, and too cheap to dole out the dollars for a tiny bit of oats mixed with dried fruit, I decided to make my own.

The results? Oh hello, tasty, flavourful granola. Quick and easy to make, it's lovely (I'm told) with some milk. 

I used this lovely honey!
Sunday Morning Granola


2 cups regular oats
1/2 cup flake or dessicated coconut
1/2 cup slivered almonds
1/2 cup sunflower seeds (didn't have any, used up some trail mix)
1/2 cup dried cranberries
1/4 cup sesame seeds
1/2 cup honey or maple/agave syrup
1/3 cup grapeseed oil (Or use something like canola. If you try olive oil, let me know!)

1. Combine all the dry ingredients and mix well.

2. Add in the wet ingredients and mix well. Spread in an even layer that's no thicker than one inch on a well-greased cookie sheet (I used a giant tray, but you can use two smaller sheets).

Granola before I baked it.

3. Bake in 350 degree oven until golden. After about seven minutes in the oven, take the tray out out, and flip the ingredients around using a spatula. Another seven minutes, move it about again. Let it be until it looks golden.

This granola stores well in an air-tight container for up to two weeks. Some people keep it longer. Mine never lasts that long!

Granola is a free-form creative exercise. Try adding things like minced candied ginger, any sort of dried fruit, or different sorts of flaked grains or flaxseed meal. It's a great way to also use up those bits and ends of trail mix that no one seems to want to finish.

Do you have a favourite granola recipe or item to add to granola?